This is a open-source utility for downloading images and movies from your WiFi-equipped Nikon camera. Can runs on Windows, Mac, and Linux. It supports all Nikon cameras that have built-in WiFi interfaces, along with those using external Nikon WU-1a and WU-1b WiFi adapters. This software may also work with Nikon's WT-4A and WT-5A wireless adapters for the D3/D4/D8x, although I don't have any of these adapters on hand to test. This software supports Canon and Sony cameras as well, although Canon supplies its own excellent EOS Utility for wireless downloads. Airnef is licensed under GPL v3.
Downloads
The File is written in the Python programming language and is distributed in both installable form (Windows and OS X, directory of binaries for Linux) and as a source tree that can execute on any platform supporting Python 2.7.x or 3.4.x.
Description
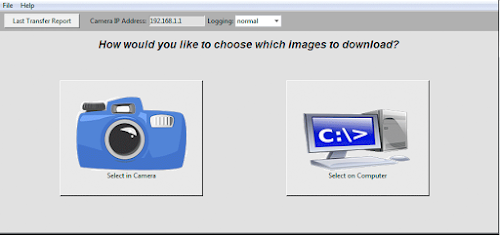
This software is two applications - a GUI front-end and a command-line app. The GUI front-end allows you to visually select the criteria of which images to download and then launches the command-line app to perform the transfer. You can optionally use the command-line version directly to script your transfers.
Major Features
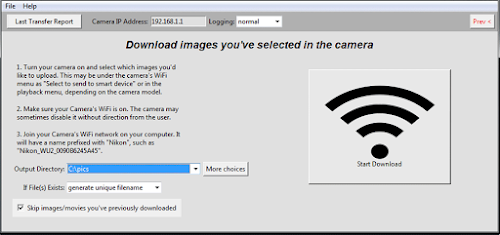
- One-button click to download all new images and video from the camera, selected on either the camera or computer by criteria
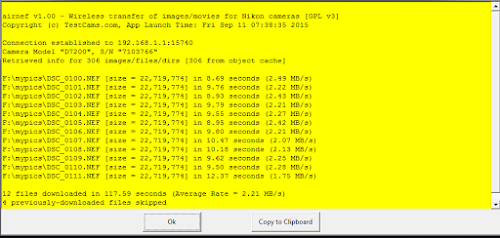
- Fast downloads - This software uses optimized Media Transfer Protocol (MTP) parameters for sustained throughput around 2.5 MB/s
- Realtime download mode - images are transferred to your computer as you shoot them. For cameras without realtime WiFi shooting support an optional staged-realtime process can be used as well.
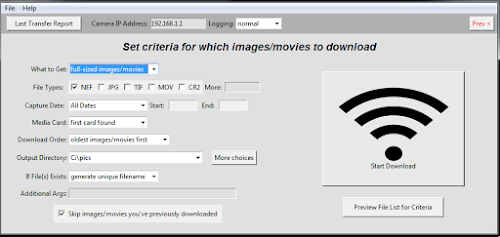
- Extensive criteria selection makes it easy to quickly choose which images to download, including by file type (NEF, JPG, MOV, etc...), starting and/or ending capture date, specific camera folders, and media card slot - in any combination. And Airnef will automatically skip over files you've already downloaded!
- Renaming engine allows you to customize the names of directories and files for images you download
- Download exec feature lets you launch your favorite image viewing or editing application for each file downloaded
- Advanced local caching of MTP metadata allows for very fast click-to-download start times
- Lets you decide the order that files are downloaded, either oldest first or newest first. That way you can start working on the files you want right away instead of waiting for all the files to be downloaded
- Fault-tolerant operation - Airnef will continuously retry any failed communication/transfer, resuming the download exactly where it left off, even in the middle of a file. This is important when downloading very large video files on marginal wireless connections
|
Camera Support Feature Matrix
This is a partial list of camera's I've personally tested. Even if your camera is not listed it may still work.
| Camera | Select Images in Camera | Select Images on Computer | Realtime Download1 |
| All Nikon cameras built-in WiFi | Yes | Yes | All DSLRs2 |
| All Nikon cameras with WU-1a/WU-1b Adapter | No3 | Yes | Yes |
| All Canon Cameras with WiFi | No | Yes | Yes |
| All Sony Cameras with WiFi | No | Yes | Staged Realtime4 |
| Nikon D750, D7200 | Yes | Yes | Yes |
| Nikon J4, J5 | Yes | Yes | Staged Realtime4 |
| Canon 6D | Yes | Yes | Yes |
1An easy way to tell if your camera supports Realtime Download is if it allows you to take photographs while its WiFi interface is enabled and in the mode required by Airnef. For example most Nikon DSLRs support shooting with WiFi enabled. In contrast, Sony cameras (in the
Send to Computer mode) and the Nikon J4/J5 require you to leave the WiFi mode before you can use the functionality of the camera again
2Nikon 1 cameras with built-in WiFi such as the J4 and J5 do not support Realtime download but can use staged realtime transfers
3Nikon bodies using an external WU-1a or WU-1b WiFi adapter have no separate menu option for selecting images to upload and the alternate mechanism of selecting images for upload in the playback menu (present in cameras with native WiFi support like the D7200) is unavailable because the playback menu is disabled when WiFi is on for cameras with an external WiFi adapter.
4Staged Realtime means the camera doesn't support taking photographs while in the WiFi mode required by Airnef but you can achieve faux-realtime transfers by shooting any number of photos in non-WiFi mode then turning your camera's WiFi on to automatically transfer those images to Airnef, then turn your camera's WiFi back off to resume shooting. You can repeat this any number of times while running a single Airnef session (no intervention required on computer). More details
here.
Installation
Windows Installer
- Download the Windows installer and launch it
- The application is unsigned so you'll receive a warning from Windows about it coming from an "unknown publisher"
- Once the installer is running you'll be prompted to agree to the GPL v3 license.
- You'll then be prompted for the installation directory, which defaults to C:\Program Files\software name (32-bit Windows) or C:\Program Files (x86)\airnef (64-bit Windows)
- A start-menu folder will be created under testcams.com, from which you can launch this software
Here are a few post-installation Windows tips that will help make this software more convenient to use:
1. Windows Wireless Tip - There is a one-time wireless setup you can perform that will allow Windows to automatically switch to your camera's WiFi network whenever you turn your camera on and/or enable its WiFi. This is much more convenient than having to manually select the network every time you'd like to download images/videos from your camera. Here are the steps for the one-time setup:
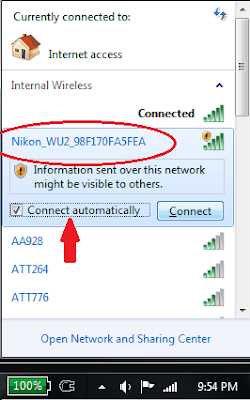
a) Turn on your camera's WiFi feature and wait for the network to be listed in the available wireless network list. It should have a name prefixed with "Nikon_", such as "Nikon_WU2_52A670FB7F45". When you see the camera's network listed, click on the network and make sure "Connect automatically" is checked, then press "Connect" button.
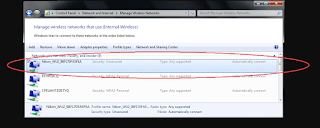
b) Right-click the WiFi icon in the bottom-right system tray and select "Open Network and Sharing Center", then click "Manage wireless networks" in the dialog that comes up. You'll be presented with a list of all the wireless networks you have ever connected to on your network. The list is sorted in order of connection priority, with the first item having the highest priority. Make sure the Nikon wireless network you just added is at the top of the priority list.
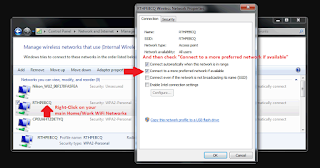
c) Even though you've made the Nikon network the highest priority, Windows will still connect to your main home/work wireless network when you don't have your camera powered on and its WiFi enabled. This is desirable. However, whenever you do turn on your camera and its WiFi to download images, by default Windows will not drop the connection to your home/work network and automatically switch to your camera's network. To have it automatically switch to your camera's WiFi network whenever it's available, right-click on your home/work network(s) and select 'Properties' from the pop-up menu. Then check the box "Connect to a more preferred network if available" and press OK to accept the changes. Now whenever you turn your camera's on and enable its WiFi your system will automatically switch to its network. Note that sometimes Windows will a while before automatically switching to the camera's network after it becomes available - you can expedite the process by clicking on the WiFi icon in the bottom-right system tray. This causes Windows to perform a network rescan immediately rather than waiting its normal polling interval.
2. Whenever you'd like to cancel the current Airnef download/operation, press <ctrl-c> within the terminal window that airnefcmd is running. DO NOT click the "X" in that terminal window's title bar - doing this will cause airnefcmd to be terminated without properly cleaning up the resources and files it was processing.
OS X application (.dmg)
- Download the OS X .dmg and double-click it
- The virtual disk image will be mounted and it should automatically open up to reveal this software application and a shortcut to your Applications folder.
- Drag and drop the Airnef application into the Applications shortcut icon.
- The application is unsigned so you'll likely need to perform a one-time security override to permanently add the application to OS X's safe application list. You can do this by right-clicking (Control-Mouse Click) on this software icon in your Applications folder and selecting open.
- Agree to open the application when prompted about it being downloaded from the internet.
- The software requires xterm but newer versions of OSX don't install it by default. You can install it from XQuartz, which is an Apple Project.
Here are a few post-installation OS X tips that will help make Airnef more convenient to use:
- When you tell the Airnef GUI to start downloading images it launches the airnefcmd application in a terminal window to perform the actual download. When airnefcmd has completed its downloads, OS X will by default leave the terminal window open, requiring you to manually close it. This can be annoying because you'll have to repeat this action after every download completion. Fortunately the OS X terminal app has a configurable setting which allows the terminal window to automatically close after a console app has completed. In the Terminal application, select 'Preferences' in the menu. In the dialog that opens, click 'Profiles' in the top left and then the 'Shell' tab. Set "When the shell exits" to either "Close if the shell exited cleanly" or "Close". See this 'sample screen image' of the dialog to help you locate this option.
- Whenever you'd like to cancel the current this software download/operation, press <ctrl-c> within the terminal window that airnefcmd is running. DO NOT click the "X" in that terminal window's title bar - doing this will cause airnefcmd to be terminated without properly cleaning up the resources and files it was processing.
Windows/OS X/Linux running this software source with installed Python interpreter
Instead of running the bundled Python environment that ships with the pre-built executables you can also run the source through your existing Python installation. this software supports both Python 2.7.x and 3.4.x environments. OS X and most Linux distributions install Python by default. For Linux the Tkinter GUI framework may not come preinstalled; you can install it via "sudo apt-get install python-tk". For Windows you'll need to download and install Python - I suggest enabling the option to add Python to your system path during the installation. For Linux and OSX you may need to set the airnef.pyw and airnefcmd.py as executable via 'chmod +x software name.pyw' and 'chmod +x softwarenamecmd.py'
One-Time Setup Requirements
Nikon Cameras
By default your Nikon camera has an IP address of 192.168.1.1 and runs without encryption. You can modify both the IP address and wireless security via a one-time procedure using Nikon's Wireless Mobile Utility app. Nikon has published instructions on modifying the security settings. Modifying the IP address of your camera is useful if you run a typical network configuration that has the router at 192.168.1.1, which conflicts with the camera and makes it impossible to use a wired connection to your router/Internet at the same time you'd like to download from the camera.
More detail you can contact me in >> email <<


No comments:
Post a Comment